Welcome to Ford40.com (or Ford 4L or Ford 4.0, whatever you want to call it.) I've been driving a 4.0 V6 OHV equipped Ranger for 10 years now and am very surprised at how little info there is on the net for this engine/vehicle combination. So I put up this site to let others know what I've learned. In those 10 years, I've also made some mods to my Ranger that would be good for any Ranger, Explorer or SportTrac with the 4L V6 engine, and I've included them as well.
Common problems and solutions:
Modifications:
Resources:
I bought the PVC fittings here.
I bought some flex PVC pipe here.
I bought my clone golf clubs here.
I bought the headers & MAS here.
I bought my truck tires here.
What I believe & why:


Disclaimer: This website is a Ford fansite. It is not authorized, nor endorsed by Ford Motor Company. No affiliatation or association exists between Ford40.com (aka Ford4L.com) and Ford Motor Company. All trademarks are property of their respective owner(s).
Cold Air Intake Box Modification on the Ford 4.0L V6 in Rangers, Explorers and Sporttracs for more airflow while keeping the "cold air" system.
If you've done some of the other mods, this can really wake up the engine. The problem with the factory air box is there is only one way air can get to it, it's small, and it's not a very easy flowing method. You can do any modification you want, but until you get more air to the airbox, it'll never met it's the performance potential. Not only does this modification allow more air to the airbox, but it's true cold air induction. I'll show you how to more than double the air getting to the air box for $15 in parts and an hours work. Plus since it's a cold air induction, you'll gain even more than from a typical "air intake system." You'll need a drill, 1/4" drill bit, a 3.5 or 4" hole saw, a 3.00" hole saw, some PVC glue (Silicone would work if you want to be able to take it apart), a flat blade screwdriver and/or an 8mm nutdriver. (To see why I did this, instead of just buying some retail "air intake system" see my findings on underhood air temperature on the K&N Filter page.)
If you have already read this page, you can the Ford Air Box Kit here but I recommend you read the whole page first.
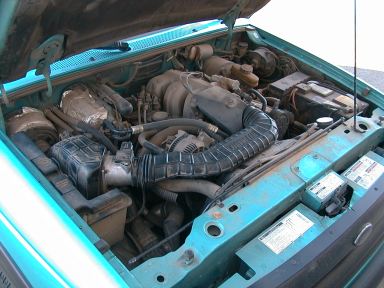 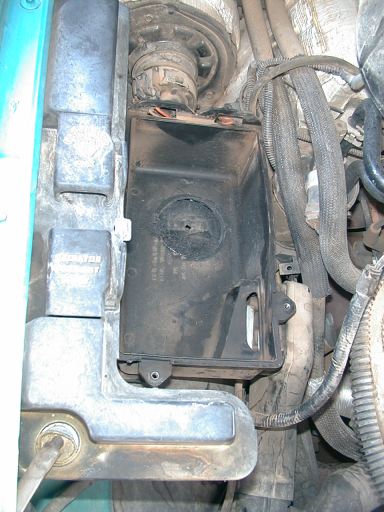 | The first thing you'll do is remove the air channel. Just loosen the two clamps on either end and pull off the rubber hose, then remove the air channel from the truck. Next you need to remove the top of the air box and the air filter. There are two 8mm screws near the front of the air box, just unscrew them with the nutdriver, and then lift up, and pull forward to clear the tabs at the back of the air box. Remove the air filter element and put it aside. The next thing will be to drill a 1/4" pilot hole as shown in the picture to lower left. It should be 2-3/8th of an inch (60mm) from the drivers side wall of the air box, and 3-3/8th of an inch (86mm) from the back wall of the airbox. (All measurements at the bottom of the air box.) Be very careful when you drill the hole, as the box can get brittle and crack. Use light pressure and a sharp drill bit. Be sure your pilot hole goes all the way through the bottom of the air box, it's mounting pad and the inner fender well because you will be using that pilot hole for 3 cuts and you need it to be sure everything is aligned. Now go ahead and get yourself a 3.00" (76mm) hole saw and very carefully cut a 3.00 hole in just the bottom of the air box. Again, you have to be careful because the box can become brittle and break easily. Cut only thru the air box, don't cut into the mounting plate below it. Once you have the 3.00" hole drilled in the bottom of the air box, you can remove it from the mounting pad. You do this by removing the one screw near the factory air intake on the air box on the drivers side, plus pushing/pulling out the factory inlet to the bottom side of the box. Just push it out with a large flat blade screwdriver. Once it's out, left up and gently remove the air box. (There are two "bullets" or "pins" on the drivers side of the box holding it in. Just wiggle it a little bit while pulling up and it'll come right out. | |
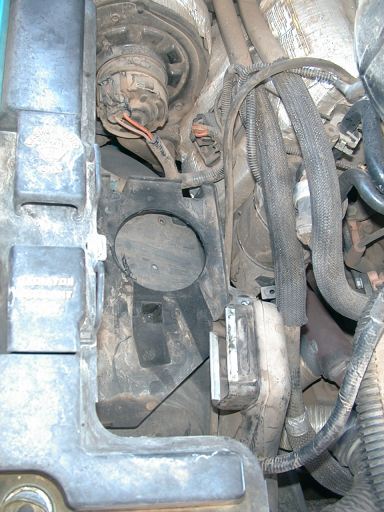 | Okay, now that the air box is removed you will use a 3.5" (89mm) or 4" (102mm) hole saw to cut a hole in the air box mounting plate. Again, use the pilot hole as your guide. When done, it should look like the picture to the left. (Just in case you were wondering, you have to cut a 3.5" or 4" hole to clear the nut on the bottom of the bulk head fitting. Just use whatever size hole saw you have, no less than 3.5" and no greater than 4") | |
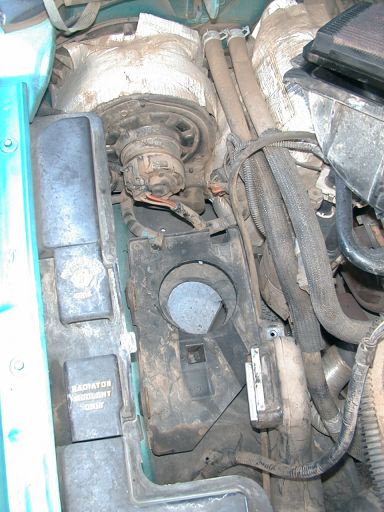 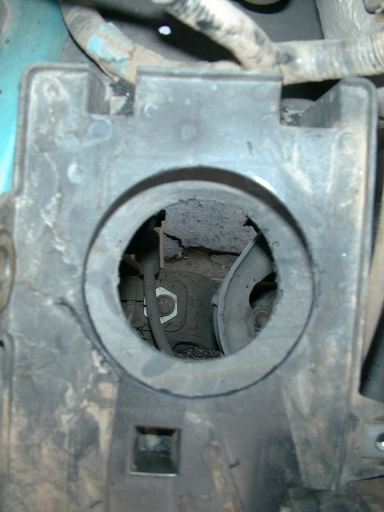 | Next thing is to use the 3" (76mm) hole saw to cut a 3" hole saw in the inner fender. Again, just use the same pilot hole to center everything up. Once you get that cut, it'll look like the photo to the left. Below that photo is a closeup of the concentric holes. One in the air box mounting pad, the botton one in the inner fender.
Note in the bottom picture shown looking straight down, this air intake is not above the tire at all, but above the suspension components. I only bring this up here beause in later photos it looks like the air intake is just above the tire. This is not the case at all and there is plenty of clearance. | |
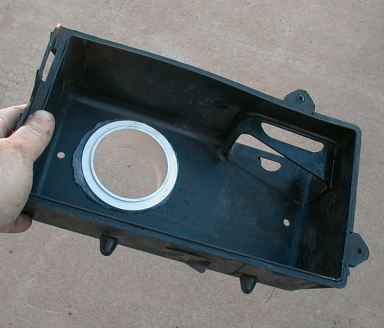 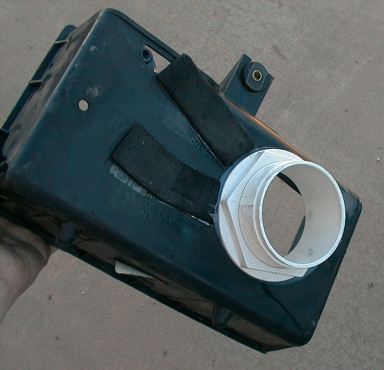 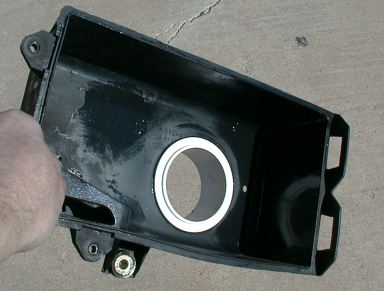 | Now you will install the secondary air intake bulk head fitting in the air box. I cleaned it up with alcohol and added a little silicone to the bulk head fitting just to hold it all in place better. (Note: the new kit comes with a 2" fitting and a gasket, so no silicone is needed.) I cleaned the extra silicone with alcohol and toilet paper. You might be wondering "Why even bother with the bulk head fitting?" The main reason is that if you just pull air from a hole in the bottom of the box, you'll be pulling in hot engine air, which is right next to the exhausts on the passenger side. Another reason is that if you don't put the bulk head fitting and down pipe in there, then water will splash up through the hole all over your engine. Last reason is that by installing the bulk head fitting and tightening it down, you restore the strength to the air box that you lost by cutting a hole in it. :-) Note: the pictures to the left show the 2.5" fitting. The "kit" now uses a 2" fitting, so it'll look a little different than the pictures here. Also you don't need to silicone it because the 2" fitting comes with a nice neoprene gasket. All saw sizes noted are for the 2" fitting. | |
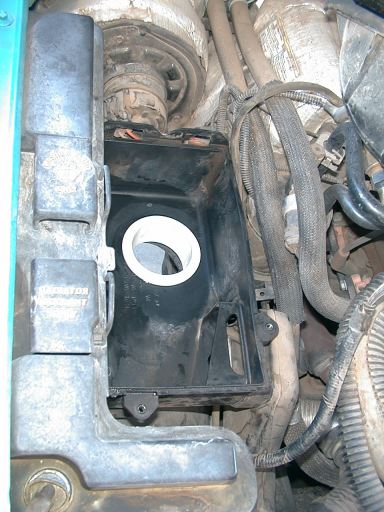 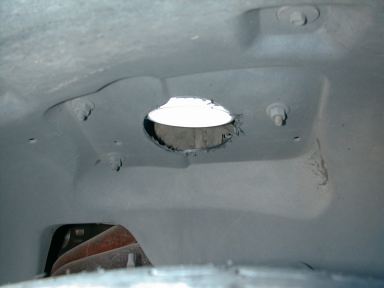 | Once you have the bulk head fitting in the bottom of the air box and the silicone cleaned up, you can reinstall the air box to the air box mounting pad. It might be a little tricky getting it to go through both holes, but if you are gentle, it'll go right in after a little bit of wiggling. See the photos to the left and below. You will note the bulk head fitting does not go all the way through. | |
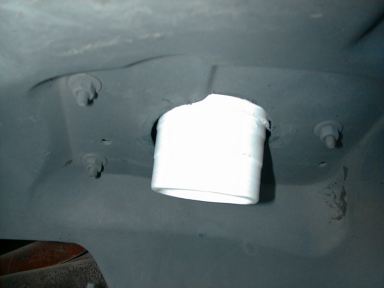 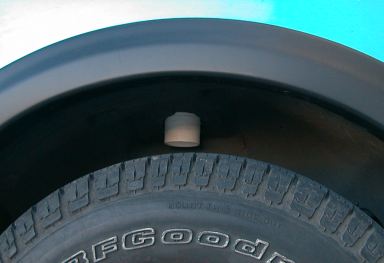 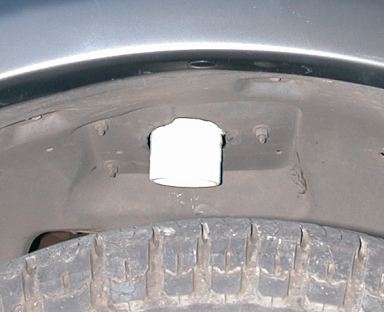 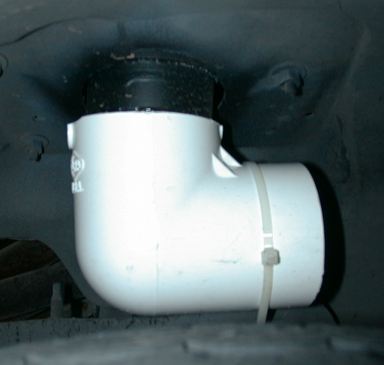 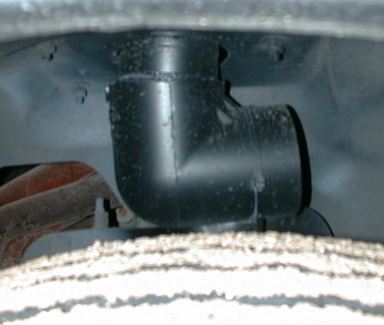 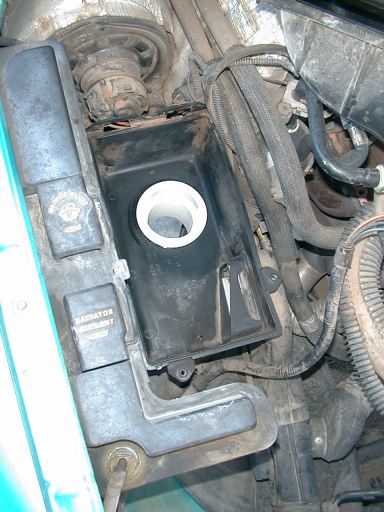 | You'll glue it in place with PVC cement with about 1" into the bulk head fitting and about 2" hanging down. In the pictures to the left it looks like it's right above the tire, but in fact, that's an optical illusion. The fitting is actually several inches inside of the tire, and in fact, directly over the suspension pieces. The last picture shows what it looks like from the top. Also I painted the white PVC pipe with some self etching primer and then matt black paint. I took a picture, but it blended so well, you can't even see what's there. Also not shown is the little bit of silicone I ran around the pipe to seal it to the inner fenderwell to keep water out of the engine compartment.
Also, if you are worried about water getting up inside the air box, don't worry. What will happen is the water will just run out the factory inlet. However, if you are still worried, you can glue on a 2" PVC 90, facing forward (which is what I did, see pix to the left.) You'll have to cut about 1" off the 2" PVC 90 to get it to fit over the pipe hanging down. Just use silicone to hold in in place in case you ever have to take the air box off. See the pics to the left. I also used a tie-wrap as an extra precaution to keep everything in place. Just ran around the 90 and the upper suspension mount. It was easy. Now, you should be safe from water getting into the engine as long as you don't have water 6" over your tires. :-) | |
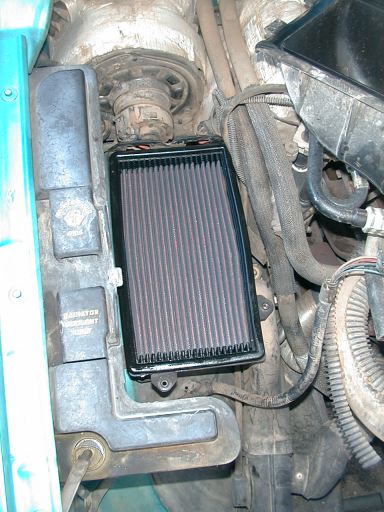 | You are almost done. Just put the air filter back in the air box, and attach the lid. Hook up the air channel and you are done. | |
 | This is what it looks like when you are finished! Exactly how it looked when you started. Ie. No one will easily tell what you've done. Now the question is, what's it worth? Using an old Gtech and less than optimium conditions, it shows a 12hp gain. I can also tell by the "seat of the pants" dyno. :-) Of course my truck already has headers, a 70mm MAS, 2.5" exhaust, flowmaster, aftermarket cat and K&N filter. On a stock truck, it'll be less, but for the amount of time and money involved, you will not regret it one bit! If you need the bulk head fittings, FlexPVC.com was nice enough to add them to their site. You can get the Ford Air Box Kit here. But don't bug them with technical questions, they are just provding the means to buy the kit online. If you have any questions, just click here to contact me. You can also send an email here:  |
NOTE: The pictures above show me using a 2.5 bulk head fitting. Due to the number of people asking for "kits" I've changed the "kit" to use a 2" bulk head fitting. I did this for several reasons. The first is that the fitting of the 2.5" pipe into the 2.5" bulk is difficult because the pipe does not fit exactly and you have to modify the pipe to fit the fitting. Also the 2" stuff is more than enough air flow, more than doubling the factory inlet size. Lastly, the 2" fittings make it a lot easier to get the air box back into place after you install the bulk head fitting. I have updated the instructions for the 2" bulk head fitting, so the hole saw sizes noted are correct for the 2" fitting.
The above was done on my 1994 Ranger 4.0 V6 4x4. I suspect most all the Rangers, Sport Tracs, and Explorers are the same in regards to the air box and this modification should work on most. Several people have bought the kit and used it on other year Rangers, Explorers and Sportracs and reported back good results and only slight modifications from what I did above on the 1994. I've driven through a lot of rainy and watery streets and there is no indication of water in the airbox or tube going to the throttle body. The only "off road" I do is out in the desert. Plenty of dust, no water, no mud. Of course you should check your vehicle after doing this modification just in case.
Thanks for visiting stealthranger.com